DIY Solar Panel Kit: Step-By-Step Instructions and Tips
DIY Solar Panel Kit: Step-By-Step Instructions and Tips
Have you ever looked at solar panels on someone’s roof and thought, “I’d love to go solar, and I’d love to do it myself?” Well, you’re not alone in your thinking. If you’re considering taking the leap into solar and are intrigued by the prospect of a installing it yourself, that’s exactly where DIY solar panel kits come into the picture. These kits represent a revolution in how people like you can harness the power of the sun from your own rooftop.
Solar panel kits bundle sunshine and savings into a box of potential. These kits are designed to include almost everything you need to get started with solar energy. They’re tailored for those who prefer a hands-on approach and are keen to understand the ins and outs of their energy system.
But before you dive in, it’s important to understand what you’re getting into. Solar panel kits aren’t a one-size-fits-all solution. They come in various shapes, sizes, and capacities to suit different needs and goals. In this guide, you’ll learn everything you need to make an informed decision about selecting and installing a solar panel kit, ensuring that you can approach this project with confidence.
Why Choose a DIY Solar Panel Kit?
So, you’re intrigued by the idea of a solar-powered life, but why should you go the DIY route with a solar panel kit? For starters, it’s the most hands-on way to take control of where you get your electricity. Plus, by taking on the installation yourself, you can avoid the labor costs associated with professional installation.
Additionally, installing your own solar panel kit gives you a deeper understanding of your solar power system. This can be incredibly beneficial for troubleshooting and maintenance down the line, especially with a grid hybrid or off grid solar system that includes batteries. A DIY approach also allows you to customize your setup to your specific preferences, something that may be more limited when working with a professional installer. With a DIY solar kit, you build it your way.
Lastly, there’s the sheer satisfaction of completing a project like this on your own. The sense of accomplishment that comes from successfully installing a solar panel system can be just as valuable as the financial savings. And with the growing number of DIY solar installers, you’ll become part of an enthusiastic community.
Solar Panel System Kit Types: Grid Solar vs. Off-Grid Solar
Diving into the world of solar, you’ll encounter two main systems: on grid solar and off-grid solar. Each has its own set of characteristics and is suited to particular lifestyles and goals. Knowing the difference is key to choosing a solar panel kit that makes sense for you.
Grid Solar Systems are tied to the local utility grid through your electrical panel. If your system produces more energy than you use, the excess can be fed back into the grid, often earning you credits on your utility bill through a process known as net metering. This connectivity to the grid gives you the greatest flexibility in how you use power, because it automatically draws from your utility when your solar panels aren’t producing enough electricity to meet your demands.
Off-Grid Solar Systems, on the other hand, are the solar equivalent of moving to the wilderness to live off the land. These systems are entirely disconnected from the utility grid. They require a set of batteries to store energy for use when the sun isn’t shining. Going off-grid means you’re completely self-reliant for your energy needs, which can be both liberating and challenging. It’s a popular choice for remote locations where connecting to the grid is impossible or too expensive.
What Does a Complete Solar Panel System Kit Include?
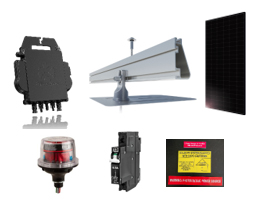
When you’re exploring the world of solar panel kits, understanding what a complete solar kit includes is crucial. But what exactly should you expect to find inside? A comprehensive kit includes solar panels, of course, which are the heart of the operation. These panels come in various wattages and sizes, ready to absorb sunlight and convert it into electricity.
Next, you’ll find one or more inverters, which are the brain of the system. These devices take the direct current (DC) electricity produced by the panels and turn it into alternating current (AC) electricity that your home can use. Some kits come with a microinverter for each panel, while others include a central (string) inverter that handles the conversion for the entire array.
Your kit should also contain a mounting system to secure the panels to your roof or another surface. This includes racking, brackets, and hardware – the bones of your solar setup. Additionally, you’ll need charge controllers if you’re going off-grid, as they regulate the flow of electricity to and from your batteries.
Lastly, there are the cables, connectors, and possibly a monitoring system to keep an eye on your solar production. These are the veins and nerves, ensuring the smooth operation and health of your solar energy system. Together, these components form a complete DIY solar panel kit, ready to generate electricity for whatever your home needs to power.
How to Choose the Best Solar Kits
Selecting the best solar panel kit for your needs can feel like navigating a maze of technical specifications and marketing jargon. However, there are several key factors to consider that can guide your decision.
To start, consider what size of solar panel system you need. This depends on your energy consumption, which you can calculate by examining your electricity bills or calculating the appliances you want to power.
READ: How to Size a Grid Tie Solar System
USE: Off Grid Solar Load Calculator

You’ll also want to consider the efficiency of the solar panels. Higher efficiency means more electricity generation in less space, but it often comes with a higher price tag. You’ll also want to look at the wattage rating of the panels, which indicates the power output under ideal conditions. It’s important to choose a system that matches your energy consumption patterns.
Next, think about the space you have available. The size and number of panels should align with the real estate on your roof or property. It’s a balancing act between energy needs and space constraints.
The quality and warranty of the components are also vital. Look for reputable manufacturers that offer substantial warranties on their panels and inverters. This can protect you against potential defects or performance issues down the line. A solar panel kit is an investment in your future, so you want it to last.
Also think about scalability. If you anticipate your energy needs might grow, seek out a DIY solar panel kit that allows for easy expansion. This way, you can add more panels or upgrade components as needed without overhauling your entire system.
Lastly, consider the type of solar panels in the kit. There are monocrystalline, polycrystalline, and thin-film panels, each with its own efficiencies and price points. It’s like choosing between different types of engines for a car – some are more efficient, some are more affordable, but all will get you where you need to go.
What is the Best Solar Panel Kit on the Market?
The market is filled with a myriad of companies selling DIY solar panel kits, each promising to be the perfect solution for your energy needs. With the number of options, it can be challenging to determine which solar panel kit is the perfect fit for your needs. Equally important is finding a company that not only provides the best value but also possesses the necessary expertise to guide you through the process and provide technical support along the way.
Fire Mountain Solar has been assisting DIY solar enthusiasts since 2001. We are experts at designing grid tie, grid hybrid and off grid solar systems, as well as sourcing the most reliable products from the most reputable manufacturers. Additionally, we offer a range of support services for DIY solar installers and are available to provide technical assistance whenever necessary.
Step-by-Step Guide to Installing Your Complete Solar Panel Kit
Installing your solar panel kit is a journey that requires careful planning and attention to detail. Here’s a step-by-step guide to help you through the process:
- Complete all the paperwork: Before purchasing a solar panel kit, it is important to be aware that most DIY solar projects require permits. Familiarize yourself with all the necessary requirements beforehand. If your system will be connected to the grid, it is advisable to have your interconnection agreement approved before making any purchases. This step ensures that there are no potential complications that could hinder or alter your installation process. Researching Your Local Requirements
- Site assessment: Evaluate your installation site for maximum sun exposure and determine the best placement for your panels. Take precise measurements and make a note of any chimneys or vents that might require special consideration during installation. Avoid areas shaded by trees or buildings, as shade can significantly reduce energy production.
- Plan Your Installation: Before you begin installing your DIY solar panel kit, it’s important to get acquainted with everything that comes in the kit. This will give you a clear understanding of the installation process step by step. Take measurements for standard wiring runs and conduit, and identify any other necessary electrical materials or additional items needed for the installation that don’t come in your kit. It’s important that you have all the necessary parts and pieces before you start the installation process.
- Assemble Your Tools and Safety Gear: Before you climb that roof, make sure you have all the necessary tools and safety equipment. This includes a drill, wrenches, and protective gear like gloves and eyewear. Safety first – always.
- Install the Mounting System: The racking system must be securely attached to your roof or ground mount. Ensure it’s level and structurally sound, as it will need to support the weight of the panels and withstand environmental conditions.
 Install the Inverter(s): If you have microinverters, they will installed on the racking before you mount the solar panels. If you have a string inverter, which is typical for off grid systems, the inverter’s location should be carefully chosen – it needs to be close to the panels and your electrical panel or batteries, but in a protected space.
- Mount the Solar Panels: Once the racking and microinverters are in place, attach the solar panels. Make sure they’re tightly secured and properly grounded.
- Wire the Panels: Connect the panels to the inverter(s). Exactly how this is done will differ depending on whether you have micro inverters or a string inverter. Pay special attention to wiring connections, as improper installation can lead to inefficiencies or hazards.
- Battery-Based Systems: If you have a battery-based system with a string inverter there are some additional steps. Please note, steps for installing an integrated system such as the Tesla Powerwall or Simpliphi Access PHI are not addressed here.
- Charge Controller If you have a battery-based system with a string inverter, you will wire your panels to a combiner box and then to your charge controller. The charge controller is then wired to the string inverter and your solar batteries.
- Batteries: Depending on which batteries and how many you have, you will connect them to each other in series and/or parallel (if you have multiple batteries), and then connect them to your charge controller(s).
- Combiners, Disconnects and Rapid Shutdown: Local regulations and the National Electric Code (NEC) require the use of various safety shut-off mechanisms. While specific requirements may differ depending on your local jurisdiction, certain measures like rapid shutdown are mandated nationwide. It is important that you include all the appropriate devices for disconnecting your solar system, as this is necessary for successfully passing your electrical inspection and ensuring the safety of yourself and those around you.
- Connect to Your Electrical Panel: Most solar systems connect to your home through your electrical panel. If you have a grid tie system, the electrical panel is also how you will feed power back to the grid.
- System Testing: Now is the moment of truth. Power up your system and test to make sure everything is working properly. The best time to do this is when the sun is shining, so your system is producing plenty of power to test how it is charging your batteries or running your loads. If you have a grid tie system, once it is tested you should turn it back off until your electrical inspection is completed and your new bidirectional meter is installed by your utility.
- Inspection and New Meter Installation: Once your installation is complete and you’ve test the system, it’s time to call for any inspections you need. If you have a grid tie system, after the electrical inspection is signed off you can notify your utility that you are ready for your new bidirectional meter to be installed.
- Enjoy! Your DIY solar panel kit is now operational, allowing you to reap the reward of your hard work by generating your own electricity to reduce your electrical bill or to provide power at your remote off grid location.
Safety Tips for Installing Solar Kits
 Always use proper safety equipment, like gloves, safety glasses, and a hard hat if necessary.
When installing solar kits, safety should be your co-pilot. It’s not just about getting the job done; it’s about doing it without any mishaps. Here are some safety tips to keep in mind:
- Electrical safety is paramount. If you’re not experienced with electrical systems, consider hiring a professional to make the final connections. It’s like knowing when to call a plumber instead of tackling those pipes yourself.
- Work with a buddy. Having an extra pair of hands and eyes can prevent accidents and make the installation go smoother. Plus, it’s more fun to share the experience.
- Keep an eye on the weather. You don’t want to be on a roof during a storm or high winds. Plan your installation for a clear, calm day to keep conditions on your side.
- Use tools and equipment correctly. Make sure your ladder is stable, your drill is charged, and your screws are the right size. It’s the little things that ensure a safe and successful installation.
Benefits of a DIY Solar Panel Kit
The benefits of DIY solar panel kits shine as brightly as the midday sun. First off, you’ve got the cost savings. By taking on the installation yourself, you avoid the labor costs of a professional installation. It’s like cooking at home instead of dining out – you can save some dollars by doing the work yourself. But just remember, you it will cost you your time.
Next, if you prefer a hands-on approach, the process of installing solar panels can provide you with a valuable educational experience. Through this process, you will develop a deep understanding of how your solar panel system works. And opting for a DIY solar panel kit offers you complete control over every component and material used in your system, as well as the entire installation process.
Lastly, the satisfaction that comes with successfully completing a DIY project is unparalleled. Every time your lights turn on, you can take pride in knowing that your hard work has paid off in reduced power bills or access to power where the utility grid doesn’t go.
Potential Challenges and Solutions When Installing a DIY Solar Panel Kit
Embarking on a DIY solar panel installation is not without its challenges. You might encounter technical hiccups, or the weather may not cooperate. There’s also the learning curve – you’re gaining a new skill set, and there will be bumps along the way.
But every challenge has a solution. If you encounter any technical challenges, Fire Mountain Solar is available to act as your dedicated team of expert support. As for the weather, patience is your friend. Wait for the right day to ensure your installation goes smoothly.
Learning something new is always a challenge, but it’s also part of the fun. Take your time, do your research, and don’t be afraid to ask questions. Remember, even the most seasoned solar experts started as beginners. With each step, you’ll grow more confident and capable.
Conclusion: Is a DIY Solar Panel Kit Right for You?
So, is a DIY solar panel kit right for you? If you’re the type who relishes the thought of diving into a hands-on project, yearns for energy independence, and dreams of making a difference, the answer is a resounding “Yes!” A DIY solar panel kit is more than just an array of equipment; it’s a statement of self-reliance and environmental responsibility.
As the sun sets on this ultimate guide, take a moment to envision a solar-powered life. Picture the satisfaction of watching your electricity meter run backward or having power at your remote property, knowing you’re part of the solar revolution. If that image brings a spark of excitement, then you’re ready to embrace the DIY solar panel kit adventure.
Remember, the sun is a generous ally, and with a bit of effort, you can harness its power to illuminate your home and your life. Step into the sunshine, and let’s make the world a little brighter, one DIY solar panel kit at a time.