The Ultimate DIY Solar Kit Guide
The Ultimate DIY Solar Kit Guide
Introduction to DIY Solar Kits
Are you ready to harness the power of the sun to decrease your living expenses and environmental impact, or get power to a remote location? Going solar has never been easier, thanks to Fire Mountain Solar’s DIY solar kits.
What Are DIY Solar Kits?
A (DIY) Do-It-Yourself solar kit equips you with all the major solar specific components necessary to install solar panels for your home. Generally, our DIY solar kit includes solar panels, micro inverters or a string inverter, solar panel racking, solar panel cables, surge protectors, a combiner box, NEC required PV system labels, a one line diagram, product installation instructions, and our standard design and installation support. If you want battery backup or need an off grid DIY solar kit, your kit may also include a charge controller, solar batteries, and battery cables.
Typically, DIY solar kits do not include general electrical materials, as these can usually be bought locally, allowing you to save money.
How Do DIY Solar Kits Work?
A DIY solar kit allows you to self-install a fully functional solar energy system for your home. DIY solar electricity is essentially the same as a solar system installed by a contractor, you’re just doing the installation yourself! Solar panels, installed on the roof of the home or on a ground mounted racking system, produce DC (direct current) electricity, which is converted to AC electricity by your inverter system so it can be used in your home. Once the solar system is installed, approved, and activated, your DIY solar panel installation will generate electricity for your home – reducing your bills and providing power for whatever you need.
Benefits of DIY Solar Kits
With our do-it-yourself solar kits, you can take control of your energy production. And not only will you save money on your electricity bills and installation expenses, but you can also enhance the value and sustainability of your home. DIY solar systems offer numerous advantages similar to those of professionally installed solar systems. By opting for a DIY solar kit, you will avoid escalating utility rates, boost the value of their property, make it more appealing to potential buyers, and even qualify for the federal Income Tax Credit for solar systems.
In this article, we will explore the world of DIY solar kits, the types, components, and how to choose the best DIY solar kit for your needs. We will also discuss the installation process, maintenance tips, financial incentives, common challenges, and the cost savings associated with generating your own electricity with solar. We’ve also included some customer testimonials so you can hear from real people who chose a DIY solar electric solution. So, let’s dive in and discover the exciting world of do-it-yourself solar!
Components of a DIY Solar Kit
Before we delve into the different types of DIY solar kits, let’s first familiarize ourselves with their components. A typical grid tie DIY solar kit consists of solar panels, an inverter (or micro inverters), racking and mounting hardware, wiring, and a monitoring system. Grid hybrid and off grid DIY solar kits may also include additional components, such as a charge controller, batteries for energy storage and battery cables.

Solar Panels
The solar panels, made up of photovoltaic (PV) cells, capture sunlight and convert it into electricity.
Solar Inverters
Inverters play a crucial role in the solar power system by converting the direct current (DC) electricity produced by the solar panels into alternating current (AC) electricity, which can be effectively utilized to power your home.
Solar String Inverter
A solar string inverter combines the power generated by groups of solar panels in your setup into “strings.” These units are usually installed on an interior or exterior wall, close to the electrical panel. Nowadays, string inverters are primarily used for battery-based and commercial solar systems.
Solar Micro Inverters
Micro inverters are small devices that are installed beneath and connected to one or two solar panels, enabling them to convert power at the site of the array. Micro inverters have gained popularity due to their attractive features, including module level monitoring and because they come with integrated rapid shutdown.
Solar Racking and Mounting Hardware
The racking and mounting hardware ensure that the solar panels are securely attached to your roof or anchored to their ground mounted location.
Cables, Connectors, Breakers
Components such as cables, connectors, DC breakers and surge protectors connect everything together, providing safety and allowing electricity to flow smoothly.
Solar Monitoring System (Optional)
A monitoring system provides real-time data on your solar energy production, allowing you to track your system’s performance.
NEC Required Labels
The National Electrical Code and your local electrical authority have specific requirements for labeling of solar installation. Fire Mountain Solar DIY Solar Kits include the labels required by the NEC. Be sure to consult with your local jurisdiction as they may have additional labeling requirements.
What is Not Included with DIY Solar Kits
It’s essential to note that DIY solar kits typically do not include certain materials, which you will need to acquire separately. These kits generally do not provide standard electrical supplies like wire and AC electrical components. The reason behind this is that purchasing these non-solar specific items from your local hardware or electrical supply store is usually more cost-effective.
If you’re planning to set up a ground or pole mount system, you will also need to buy steel pipe and footing materials (such as cement) locally.
Before making a purchase, make sure you fully understand what exactly is included in your DIY solar kit and what is not. Additionally, consider the cost of the items you will need to purchase locally when calculating the overall project expenses.

Types of DIY Solar Kits
When it comes to DIY solar kits, there are various options available to suit different needs and budgets. To help you make an informed decision to meet your specific needs, let’s explore the different types of DIY solar kits and their unique features.
Grid-Tied DIY Solar Kits
If you’re just looking to reduce your electric bill, grid-tied DIY solar kits are a great choice. These kits allow you to generate your own electricity, and if you live where net metering or a similar benefit is available, you can feed any excess power back into the grid for credits, further reducing your utility bills. They are typically the most affordable option and require minimal maintenance.
Off-Grid DIY Solar Kits
If you live in a location where bringing in utility power is impossible or cost prohibitive, off-grid DIY solar kits are for you. These kits include everything you need to power your home independently, even without access to the electrical grid. In addition to the solar panels, inverter and mounting system, off grid solar kits include solar batteries to store excess electricity for use during cloudy days or at night. You will also want to include a generator so you can supplement the power your solar panels make at night or when there is insufficient sunlight to meet your electricity needs. Off grid solar systems are more complex than grid tie solar systems. They are a hands-on electrical system that requires regular monitoring and maintenance.
Grid Hybrid Solar Kits (Grid-tied with Battery Storage)
The best of both a Grid-Tied and Off-Grid DIY solar system, Grid Hybrid DIY Solar Kits are more complicated to install than a grid-tied system, because they include batteries to store power for use during grid outages, power shortages, or “brown outs.” Connected to the grid, but also including at least one battery, grid-hybrid solar not only reduces your power bills, it also provides peace of mind for times when your utility power is unavailable.
Portable DIY Solar Kits
Are you someone who loves camping or RV trips? Portable DIY solar kits are a must-have. These kits are lightweight, compact, and easy to transport. They allow you to generate electricity on the go, powering your camping gear, RV appliances, or charging your devices. They are perfect for outdoor enthusiasts who want to embrace renewable energy.
DIY Solar Expansion Kits
Already have a DIY solar system? Need more electricity to meet increasing demands, or for electrification of gas appliances or a new electric vehicle? Consider getting a solar panel expansion kit to increase your energy production. These kits include additional panels and other components needed to seamlessly integrate into your existing setup, increasing your solar energy potential.
Roof-Mounted DIY Solar Kits
If you are planning on installing your DIY solar kit on the roof of your home, a roof-mounted solar kit is for you. A roof mounted solar system provides the necessary equipment to securely attach your solar system to whatever roofing material is present on your house.
Ground-Mounted DIY Solar Kits
A ground-mounted solar kit includes the necessary equipment to mount your solar panels on a free-standing racking system, so it can be located in a sunny area away from your house. Ground-mounted solar system kits should be customized based on local requirements, soil type, etc.
DIY Solar Kits in a Nutshell
To recap, grid-tied DIY solar kits are the most common type and are connected to your utility grid. These kits allow you to generate your own electricity and send any excess back to the grid, potentially earning you credits. Off-grid DIY solar kits, on the other hand, are independent systems that are not connected to the grid. They are designed for remote locations. Grid hybrid DIY solar kits offer a winning combination, providing the opportunity to generate your own electricity while still benefiting from the convenience and reliability of utility power. These kits also serve as a reliable backup power source during grid outages. If you just need a little power, a Portable DIY solar kit may be right for you. And if you already have solar and want more, a DIY Solar Expansion Kit is what you need.
Choosing the Right DIY Solar Kit
Knowing which type of DIY solar kit you need is fairly easy. Where it gets more complex is determining system size and which specific components you need.
Determining Your Energy Needs
Begin by analyzing your electricity usage to determine your energy requirements. This analysis will assist you in determining the appropriate size of DIY solar kit that you will need.
If you are installing a grid tie solar system, use your last 12 months electric bills as a starting point. If you haven’t lived in your home that long, or it’s new construction, start with how much available space you have, or how much money you want to invest to help you determine how much solar you need.
READ: How To Size a Grid Tie Solar System
If you are installing an off grid solar system, you’ll want to start with a comprehensive list of your electrical loads. Remember, when you’re off grid you’re your own power company. That means if you don’t generate and store enough power, out go your lights. So proper sizing of your off grid solar system is critical.
If you’re installing a grid hybrid solar system, follow the process for sizing a grid tie solar system, and then calculate your essential loads to determine how much energy storage you will need.
READ: Solar That Keeps The Lights On: Grid Hybrid Solar
Finding the ideal DIY solar kit to suit your needs relies heavily on accurate sizing of your solar system and energy storage needs. Many individuals realize that seeking professional design guidance is the most effective way to ensure they are making the correct choices. Fire Mountain Solar’s DIY solar kits include complimentary design assistance for the majority of projects. If you have a more complex application, we also provide advanced design assistance for a minimal charge.
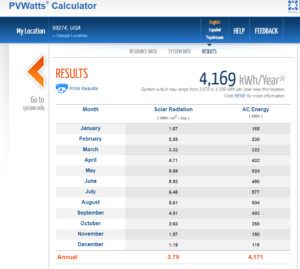
Assessing Your Location and Sunlight Availability
To maximize energy production, it is important to evaluate the location and the amount of sunlight it receives. Professional installers use tools like the Solmetric Suneye to determine how much shading a location gets on an annual basis. Once you know the impact of shading, you can use utilize online tools, like PV Watts, to help evaluate your potential solar production capacity for different sized solar system.
Evaluating Your Budget and Cost-Saving Potential
Take into account your financial resources and decide how much you are willing and able to allocate towards reducing your electricity expenses. After determining the appropriate solar power capacity that aligns with your budget, you can then assess the potential energy savings and cost reductions.
Finding Reputable Suppliers or Manufacturers
When assessing a DIY solar kit, it is important to evaluate the knowledge and reputation of the kit retailer, and also the quality and warranties of the components. Also, consider the reputation of the manufacturer, and how long they’ve been in business. A warranty is only good if the manufacturer is still around to fulfill it. As you would with any important purchase, check online reviews, paying particular attention to third party sources, as they tend to be more unbiased.
For more than twenty years, Fire Mountain Solar has been designing DIY solar kits tailored to the needs of do-it-yourself solar enthusiasts. We are eager to discuss your power system goals and provide guidance in determining the ideal size of a DIY solar kit that suits your requirements.
After considering these factors, you can select a DIY solar kit that best suits your needs and budget.
How to Install DIY Solar Kits
Installing a DIY solar kit may seem challenging at first, but with proper preparation and guidance, it can become a rewarding endeavor. The initial step is to familiarize yourself with the installation materials provided by the manufacturer and/or kit provider. This will help you understand the step-by-step process for installing your DIY solar kit, as well as any specific requirements or specialty tools necessary for the project. Prior to beginning the installation, make sure you have all the essential tools and equipment readily available.
And remember, prioritizing safety is crucial, so if you have any uncertainties regarding the installation process, it is advisable to seek help from a professional.
Site Assessment and Preparation
If you plan to install your solar panel system on your roof, identify the sunniest open areas. Take precise measurements and make a note of any chimneys or vents that might require special consideration during installation. Additionally, be mindful of nearby structures or trees that could cast shadows on your roof, both presently and in the future. These factors may necessitate adjustments to the placement of your solar panels for optimum performance.
When it comes to installing a ground or pole mounted solar array, many of the same factors come into play. It is essential to find a spot on your property that receives abundant sunlight throughout the day while avoiding any shading caused by trees, buildings, or other obstacles that could potentially decrease the efficiency of your solar panels. One of the advantages of having a ground mounted solar system is the ability to position the solar panels in the optimal direction for maximum sunlight exposure. However, there is a potential downside to consider, which is the type of soil you have on your property. If your location is situated on bedrock or has loose, sandy soil, additional site work may be necessary. When requesting a quote for your ground or pole mounted solar system from Fire Mountain Solar, we will inquire about the details of your soil type. This information will then be shared with the racking manufacturer, who will provide guidance on the appropriate footings for your mounting structure.
Mounting the Solar Panels
Roof Mounted Solar
A pitched roof solar mounting system consists of three key components:
- Roof attachments
- Mounting rails
- Module clamps
Each of these components plays an essential role in providing support and stability for your solar panels.
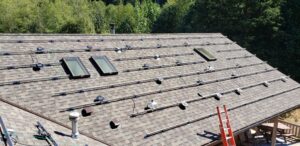
Roof Attachments
Roof attachments are specialized fasteners for mounting a solar array to your roof. They provide for secure attachment of the mounting rails. The type of roof you have will determine the options for roof attachments. For instance, if you have a composite shingle roof, the roof attachments must include flashings to prevent leaks. On the other hand, standing seam metal roof attachments use a non-penetrating clamp design.
Mounting Rails
Mounting rails connect securely to the roof attachments. These rails are responsible for holding and supporting your solar panels. Solar panel mounting rails come in various thicknesses and lengths. Thicker rails are stronger and can support more weight over longer spans between roof attachments. It’s important to note that thin rails like the IronRidge XR10 should not be used in areas where snow can accumulate on your solar panels due to the additional weight. In locations with a moderate to heavy snow load, the IronRidge XR 100 or XR1000 rails may be more appropriate.
Grounding Components
In the past, solar panels were typically grounded by attaching various components like lugs, bolts, or clips to the frame of the module. These components were then connected to a copper conductor that ran throughout the solar array. However, this method posed a risk of improper electrical grounding, which could lead to safety issues in the long run.
Fortunately, many manufacturers have come up with simpler ways to achieve this important objective. One such solution is IronRidge’s Integrated Grounding System. This innovative system bonds the modules directly to the mounting rails, eliminating the need for separate module grounding hardware. By doing so, it creates multiple parallel grounding paths throughout the array, ensuring enhanced safety for system owners.
Ground or Pole Mount Solar Arrays
 Ground and pole-mounted solar arrays utilize similar components as rooftop solar systems, but instead of being attached to the roof, they are affixed to a framework (metal or wood), or on top of one or more poles.
For the majority of applications, utilizing a pre-made solar mounting structure is the simplest option. However, some of our customers have constructed their own wooden frames and then used standard hardware to mount their solar panels on top. When it comes to top of pole mounting, using pre-designed frames that connect to the pole makes the process of mounting your solar panels much easier. Our preferred choice for top of pole mount solar is from MT Solar, as it allows for the installation of all but the last 1 or 2 solar panels at ground level, minimizing the need for using ladders.
One of the many benefits of using pre-designed solar ground mount systems is their engineered ability to withstand strong winds and heavy snow loads. These systems often include an engineering report that details the proper size of base and footings required, as well as other important information, making the process of obtaining permits much easier.
Solar Inverters
Mounting Micro Inverters
Since the microinverters are mounted underneath the panels, they need to be fastened to the rails before the panels are placed. The manufacturer supplied mounting components are specifically designed to create a solid ground connection between the inverter body and the aluminum rails. The inverters are bolted onto the rails, and the 240V AC bus cable is connected to them. Finally, one end of the AC bus cable is routed into a junction box.
Mounting a String Inverter
String inverters are typically positioned on either an indoor or outdoor wall in close proximity to the electrical panel. It is important to ensure that a sturdy surface is used for installation and that sufficient ventilation is available. The chosen mounting location should be easily and safely accessible at all times, without the need for a ladder or scaffolding. It is important to adhere to the manufacturer’s instructions regarding the mounting position and to be aware of any relevant local and national electrical code requirements.
Rapid Shutdown Device (RSD)
To ensure the safety of emergency responders, the National Electrical Code (NEC) mandates that all rooftop solar systems on approved buildings have the capability to individually shut down each solar panel. The specific components for this shutdown will depend on your system. If you install micro inverters, they are equipped with integrated module level shutdown and arc fault protection. However, if you are using a string inverter, separate devices, like the Tigo TS4-A-2F, will be necessary to meet the requirements for rapid shutdown.
Battery-Based DIY Solar Systems
If your system has batteries for off grid, or for emergency backup power (grid hybrid), there will be additional components that need to be installed. What these components are will depend on whether you have an integrated inverter/battery system, like the Tesla Powerwall or the Briggs & Stratton Simpliphi Access, or if you have separate components such as an OutBack Radian GS8048A inverter with EG4 lithium batteries.
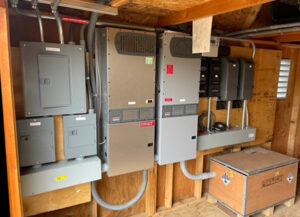 For both a grid hybrid and off grid DIY solar kit, you’ll probably need more area for the indoor components. These may include:
- Wall mounted battery/inverter/charger package
- Floor mounted battery/inverter package/charger package (depending on installation, you may need to pour a pad for level placement)
- Battery-based string inverter(s)
- Load Center
- Charge controller(s)
- Solar batteries
- Battery box
Wiring Your DIY Solar System
The process of connecting your DIY solar system will vary depending on the specific type of system you have. However, in general, the procedure will involved steps similar to those outlined below:
Wiring a Grid Tie Solar System (String Inverter)
- Solar panels to junction box
- Junction box to string inverter
- Inverter to electrical panel
Wiring a Grid Tie Solar System (Micro Inverters)
- Solar panels to micro inverters
- Micro inverters to junction box
- Junction box to electrical panel
Wiring an Off Grid Solar System
- Solar panel strings to combiner box
- Combiner box to charge controller(s)
- Charge controller(s) to the solar batteries
- Solar batteries to string inverter(s)
- Inverter(s) to electrical load panel
Testing and Commissioning the System
Once everything is connected, it’s time to test your DIY solar system. The startup process will vary depending on the type of system you have. Refer to your owner’s manuals for the exact steps of the startup procedure. For grid tie systems, most utilities require the system to be turned off until they provide approval to energize. So once your system is tested, turn it back off.
Permit Signoff and Meter Installation
Have your electrical, construction, and/or any other necessary permits signed off. This typically involves an evaluation conducted by your local electrical inspector and possibly the building and fire departments.
If you are connected to the grid, once your permits have been approved, reach out to your utility company to finalize your interconnection agreement and obtain authorization to activate your system. Depending on the type of meter you currently have, the utility company may need to install a new bi-directional meter to enable net metering. Once you have received all the necessary approvals, you can proceed with activating your system.
You’re now generating your own power!
Solar System Maintenance
The level of ongoing maintenance required for your solar system will vary depending on the type of system and the specific equipment you have installed. Typically, a grid tie solar system requires minimal maintenance, while a system with batteries may need more regular upkeep. Off-grid solar systems demand the highest level of monitoring and maintenance to ensure optimal functionality. It’s important to regularly check and maintain off grid solar systems to prevent any issues that could leave you without electricity.
Regular Cleaning and Inspection of Solar Panels
Over time, dust, debris, and bird droppings can accumulate on the surface of your solar panels, reducing their efficiency. Clean them regularly with a soft cloth and mild soap to remove any dirt. Additionally, trim any nearby trees or foliage that may cast shadows on the panels and reduce their efficiency.
Monitor Your System Performance
Keep an eye on your energy production to ensure everything is functioning as it should. Checking on a monthly basis is recommended. If you have remote monitoring, you can do that anywhere you have internet or mobile access. If you don’t, check the display on your string inverter or micro inverter communication unit. If you notice a significant drop in output, it could indicate a problem with your DIY solar kit.
Important note: with micro inverters, no reading on the communication unit or online rarely means your system is not producing. It is almost always just an issue with the monitoring components – most likely a disruption in your WiFi or internet connection so no data is being transmitted to the software. Contact Fire Mountain Solar or refer to your owner’s manual for remote monitoring troubleshooting tips.
Inspect for Damage
Periodically inspect your solar panels for any signs of damage, such as cracks or loose connections. If you spot any issues, you will want to repair or replace the damaged components. Inspect the wiring and connections for any signs of wear or damage.
Check the Batteries
If your system includes flooded lead acid solar batteries, check their water levels regularly and ensure they are properly charged. You will also want to check the battery
Also check the lugs on your battery cables for corrosion, and make sure they are tight to eliminate power loss due to loose connections.
Financial Incentives for DIY Solar Kits
Investing in a DIY solar kit not only helps the environment, but it can also provide significant financial benefits. Some states and utility companies offer financial incentives or other programs to encourage the adoption of solar energy. These may include tax credits, grants, rebates, and net metering programs.
Solar Tax Credits and Rebates
Tax credits allow you to deduct a portion of the cost of your DIY solar kit from your taxes, reducing your overall tax liability. In Washington state, solar systems between 1,000 and 100,000 watts (DC) are sales tax exempt. This exemption applies to a DIY solar kit.
And the federal solar income tax credit (Solar ITC), now called the Residential Clean Energy Credit, equals 30% of the expenses associated with the installation of new, eligible solar systems for your home, and is valid from 2022 until 2032. The credit rate decreases to 26% for properties put into service in 2033, and further reduces to 22% for properties placed in service in 2034. It is possible for you to claim this credit if you have made energy-saving enhancements to either your primary or vacation residence located within the United States.
It is important to understand that this credit is not eligible for a refund, meaning the credit amount you receive cannot surpass your tax liability for the specific year in which the credit is claimed. However, any excess credit that remains unused can be carried forward and applied towards reducing your future tax obligations. Please be aware that interest paid, including loan origination fees, should not be included when determining the credit amount.
Net Metering
Net metering programs allow you to send excess electricity back to the grid for credits, reducing your energy costs.
Financing Options and Grants
Many lenders offer affordable loans designed specifically for energy-saving initiatives such as solar power. However, it is important to note that DIY solar kits typically do not qualify for these types of loans. Instead, you may need to explore options such as personal loans, home equity lines of credit, or even utilizing your credit card. Furthermore, it’s worth mentioning that most grants and rebates, such as the USDA REAP grant, often require professional installation of the solar electric system in order to be eligible.
By taking advantage of available financial incentives, you can make your DIY solar kit even more cost-effective.
Potential Challenges of DIY Solar Kits
While installing a DIY solar kit is a relatively straightforward process, there can be some challenges along the way.
Permitting and Legal Requirements
One common challenge faced by individuals who choose to install solar panels themselves is obtaining the required permits and approvals from local authorities. It is crucial to research the specific requirements beforehand to ensure that your DIY solar installation adheres to all relevant regulations in your area. You will need to acquire an electrical permit, which means identifying the appropriate issuing authority for your location. Additionally, it is advisable to consult with your local building department to determine if a building permit is necessary. And depending on your location, it may also be mandatory to undergo an inspection by the local fire authority.
Technical Knowledge and Skills Needed
Installing solar panels can present various challenges, particularly when it comes to the physical installation process. This is especially true if you are working at heights or lack experience with electrical wiring. However, with some basic construction skills and a willingness to consult manuals, you can join the numerous FMS clients who have successfully installed their own DIY solar kit. But if you are uncomfortable with any aspect of the installation, it is best to seek professional help.
Potential Risks of DIY Solar Installation
Bad weather can create hazardous conditions for installation of your solar panels, so be sure to plan accordingly. Avoid installing solar panels during high winds as they can act like large kites until securely attached to the mounting system.
By adequately preparing, reaching out for help when necessary, and adjusting to unexpected situations, you can overcome these challenges and successfully install your DIY solar kit.
Considerations Before Choosing to DIY Solar
When thinking about choosing a DIY solar kit for your solar system installation, there are several factors that need to be taken into account. Opting for a DIY option means that you will have to handle numerous tasks and checklist items that would typically be handled by a full-service installation. Some of these tasks may include calculating your historical and annual electricity usage, obtaining approvals for utility interconnection, acquiring necessary permits, determining the amount of electrical wire and supplies needed for the project, and more. However, this should not discourage you from pursuing a DIY solar system! By choosing a reputable vendor like Fire Mountain Solar, you gain access to a knowledgeable support team that can assist you throughout the entire DIY solar process.
Advantages and Limitations of DIY Solar Kits
There are a few major advantages to DIY solar installation. The first is cost! DIY solar kits are a much more affordable solution for pursuing solar energy. DIY solar kits also put you in complete control of all aspects of the installation, so you can customize things like individual solar panel placement to your liking. This also means that you will be responsible for ensuring the system meets safety and permitting standards.
DIY solar systems have the same limitations as a system installed by a contractor, but by choosing a DIY solar installation you also may be limited by your own skill and/or comfort level. Installing a solar system requires you to be comfortable with basic construction tasks, electrical wiring, and navigating permitting and utility approval processes. None of these tasks are so difficult that they cannot be learned, and when you choose Fire Mountain Solar as your DIY solar kit provider, we can assist with the learning process.
Safety Precautions For Installing Your DIY Solar Kit
When it comes to installation of DIY solar kits, it’s important to prioritize safety. While these kits are designed to be user-friendly, there are still certain precautions you should keep in mind to ensure a safe and successful installation.
First and foremost, always read and follow the instructions provided by the manufacturer. Each DIY solar kit may have its own specific installation and safety guidelines, so it’s essential to familiarize yourself with these before starting the installation process.
When working with solar panels during DIY installation, keep in mind that they produce power any time they are exposed to light, even if they are not wired to anything. Therefore, it’s crucial to take necessary precautions to prevent electrical shocks. Make sure to turn off all power sources and wear appropriate personal protective equipment, such as insulated gloves, rubber soled shoes, and safety glasses. And though it seems obvious, don’t stick your fingers into the junction box.
Additionally, be cautious when working at heights, if you are installing solar panels on your roof. Use proper safety equipment, such as a sturdy ladder and harness, to prevent falls or accidents.
If you’re unsure about any aspect of the installation, don’t hesitate to seek professional assistance. A certified electrician or solar professional can provide guidance and ensure that your DIY solar kit is installed correctly and safely. At Fire Mountain Solar, our DIY solar kits come with a standard technical support package. And if you need additional help, we can provide that for a reasonable fee.
By following these safety precautions, you can minimize the risk of accidents or injuries while handling DIY solar kits. Remember, your safety is paramount, and taking the necessary precautions will help ensure a successful and safe installation process.
Conclusion: Is a DIY Solar Kit Right for You?
As we explored the world of DIY solar kits, we revealed the numerous benefits they offer, ranging from cost savings and energy independence to environmental sustainability. By choosing the right DIY solar kit, installing it correctly, and properly maintaining it, you can enjoy the rewards of clean, renewable energy. While there may be challenges along the way, the satisfaction of generating your own electricity is immeasurable. So, If you are ready to embark on the exciting path of DIY solar, contact Fire Mountain Solar for all your DIY solar kit needs. Let the sun power your home and embrace a brighter, more independent future today!
Next Steps Toward Your DIY Solar Project
Ready to get started on your DIY solar journey? You can contact us to get started, browse pre-designed solar kits, or learn more. If you’re in Washington State, Fire Mountain Solar can offer comparisons with our full service installation and on-site technical support. Not in Washington? Reach out to our support team for virtual technical support, customized DIY solar kit designs, and more.